| Home • Reviews • Forums • News 2015 • 2013 • 2012 • 2009 • 2008 • 2007 • 2006 • 2005 • 2004 RSS Feeds • FOV Factor Table • Sensor Sizes | Definitions: A-D • E-H • I-L • M-P • Q-U • V-Z | Sitemap Articles • Archived Websites (Pre-DigitalDingus): D100 Lounge • E-10 Club | Contact |
| Eye-One Display 2 by GretagMacbeth |
|
| Monitor Calibration (Part 3) December 4, 2006 |
|
| Eye-One Display 2 Introduction • What's In The Box / Closer Look Eye-One Display 2 Monitor Calibration • Monitor Calibration (Part 2) • Monitor Calibration (Part 3) Eye-One Display 2 Specifications • Eye-One Display 2 Conclusion
|
|
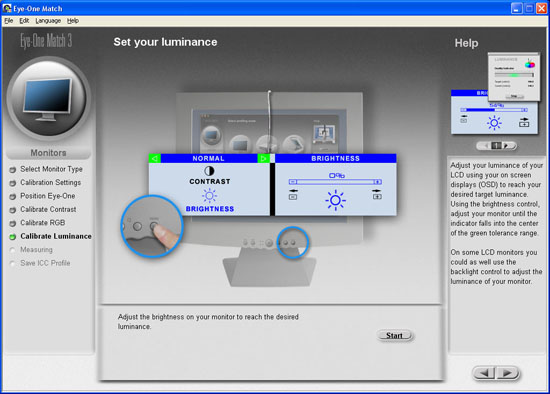
Set Your Luminance (not available in Easy Mode) Setting your luminance is the same as the previous screen we looked at. You need to adjust your monitor's luminance so that the indicator is in the center of the green tolerance area. After this is done, it's now time for the Eye-One to begin measuring and calculating all the adjustments.

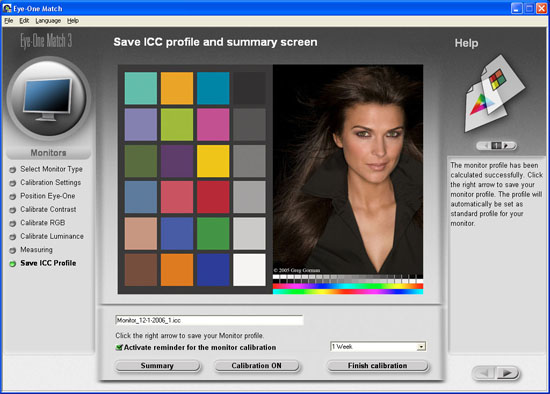
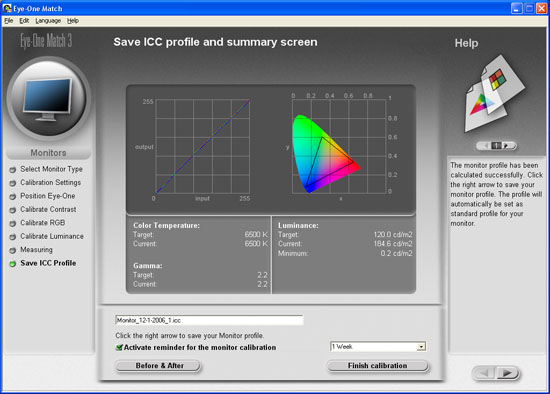
Now that you're finally done, you can save your ICC profile as well as rename it to whatever you wish. In addition, by clicking on the Summary button, you will see an informative display of your monitor's adjustments and color space range (color gamut). By clicking on the Calibration On, you will see the difference on your monitor with your new profile. Click the button again, and it will turn it off.

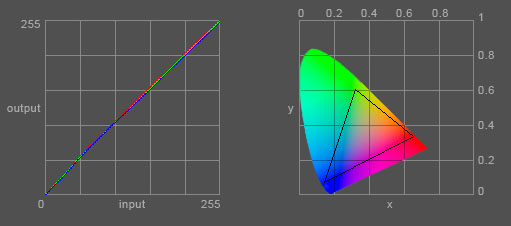
When you arrive at this screen, you have a nice amount of information about your monitor. Two graphs are seen. The first one is basically telling you how much "work" your monitor did to get the target profile. In my particular case, the monitor didn't have to do much at all because it was previously calibrated. If you just received your monitor from the factory, you would probably see a bigger difference of RGB lines being outside of the 45-degree target. Which brings up another point. You want your settings to be as much on a 45-degree angle as possible, as this represents the ideal target profile. I'll discuss this more below.

Let's take a closer look at the two graphs below:

Side-Note: Get A Good Graphics Card! Just a little side note, but since GretagMacbeth mentions the graphics card, I thought I would reinforce that statement. In order to get high-quality desired results, you need a high-quality monitor (of course), a high-quality calibration system (which we are using), but we also need a graphics card able to pump out the power to the monitor. I am currently using two different types of video cards because I have two computer systems. One is a BFG 5900XT OC AGP card, and the other is a XFX GeForce 7950GT. If you will be using a 20" or larger monitor, I recommend upgrading from ANY 5900 series video card, whether it's AGP or PCIe, and investing in a 7000 series card. The 5900 series just can't handle the power output needed. The 6800 series works great, but currently are selling as much as 7000 series cards so it's no benefit to get the 6000 series at all. Calibration Reminder An option to remind yourself of calibration intervals is possible, and you have four options, ranging from every week, to once a month (every 4 weeks). I would recommend every week for the first month to see if your settings are staying accurate, and if they are, then only once a month is necessary. However, your workflow might demand a more rigorous discipline.
|
|
| Home • Reviews • Forums • News 2015 • 2013 • 2012 • 2009 • 2008 • 2007 • 2006 • 2005 • 2004 RSS Feeds • FOV Factor Table • Sensor Sizes | Definitions: A-D • E-H • I-L • M-P • Q-U • V-Z | Sitemap Articles • Archived Websites (Pre-DigitalDingus): D100 Lounge • E-10 Club | Contact |