| Home • Reviews • Forums • News 2015 • 2013 • 2012 • 2009 • 2008 • 2007 • 2006 • 2005 • 2004 RSS Feeds • FOV Factor Table • Sensor Sizes | Definitions: A-D • E-H • I-L • M-P • Q-U • V-Z | Sitemap Articles • Archived Websites (Pre-DigitalDingus): D100 Lounge • E-10 Club | Contact |
| Logitech Harmony 676 Digital Video Remote |
| Setting Up The Remote |
| Introduction | Installing The Software |
Setting Up The Remote | Up Close: The Harmony 676 | Conclusion
|
Setting Up The Harmony 676 Now that you have the software installed, the next step is to set up the remote itself. This is a little more complicated, but Logitech's step-by-step installation makes sure it's not too difficult. Let's take a look at the remote installation below:
 ... ...
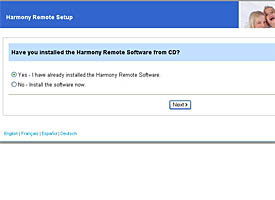
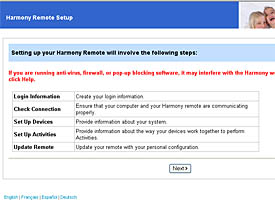
The first screen you see when installing the Harmony 676, is the confirmation screen. If you haven't installed the software as we discussed on the previous page, you will need to install it. If you have already installed the software, you check "Yes - I have already installed the Harmony Remote Software". The next screen is rather important. This shows you the entire 5-step process you and the Harmony website will go through to set up your remote. At this point in time you must have ALL Anti-Virus, Firewall, and/or Pop-Up Blocking software either turned off (which you may not want), or what I suggest: modifying the settings so that the Harmony website is able to interact with your computer without any hinderance. I use Internet Explorer, so this is only applicable to IE users, but you can add the Harmony website...
...to your "safe" list of websites. I'm sure other browsers have this setting as well, so check with your particular browser's settings. In addition, be sure 3rd party "anti-poppers" (such as Google's pop-up blocker or Yahoo!'s pop-up blocker) have the same information.
After the two screens are seen above, there are five steps remaining before your Harmony 676 is completely ready to be used. Let's take a look at these 5 steps, and what they are about:
Step 1: Login Information
This is where you will create an online account, consisting of USER ID and a PASSWORD on the Logitech/Harmony website. This account will automatically store the settings you will be adjusting and configuring in later steps.
Step 2: Check Connection
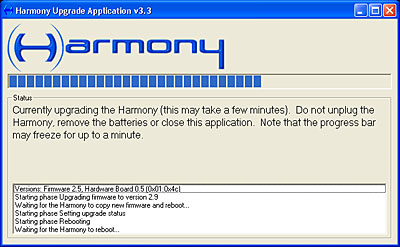
Basically, this is just a system check to make sure you have a proper internet connection and everything is in order. In addition, once the connection has been established, you will notice there is a firmware update. Currently, it is version 2.9. The following screen will appear below:

Step 3: Setup Devices This step is where you will enter in all of your components online, so their remote functions will be downloaded to your remote. You will be asked to enter in the make and model numbers of your components, so be sure you have those available to you when you complete this step. Step 4: Setup Activities Activities are one-button commands which trigger multiple devices. Activities perform multiple remote transmissions with the press of one button. For example, to "watch a DVD", you could configure the remote to turn on the Television, turn on the DVD player, and turn on your amplifier or receiver. Many other possibilities exist. Step 5: Update Remote Any changes made to the remote are finalized in this step, by downloading the new information to the remote.
|
| Home • Reviews • Forums • News 2015 • 2013 • 2012 • 2009 • 2008 • 2007 • 2006 • 2005 • 2004 RSS Feeds • FOV Factor Table • Sensor Sizes | Definitions: A-D • E-H • I-L • M-P • Q-U • V-Z | Sitemap Articles • Archived Websites (Pre-DigitalDingus): D100 Lounge • E-10 Club | Contact |